
It’s been a while since I wrote on Car hacking using Instrument Cluster Simulator. I had promised to write a three-part series on Car Hacking, Part I — setting up the Simulator, Part II — playing with CAN frames, and the last part — on SavvyCAN, fuzzing the CAN frame and doing this on a real car. Unfortunately, I got occupied with a lot of work, got into bug bounties, and I never got a chance to complete this three-part series. It’s a long overdue, but I am finally writing it.
If you haven’t gone through any of those blogs, I would highly recommend doing so, it will help you understand this part better.
Part I: Setting Up the Instrument Cluster Simulator
Part II: Exploitation
We will now look into what SavvyCAN is and using it with ICSIM. After that, we will look into how to perform fuzzing and scripting with SavvyCAN.
SavvyCAN
There are various software’s out there that will help you monitor and filter the CAN communication. You’ve got costly and proprietary tools, as well as free and open-source tools. The purpose of this article/blog is to help you get started with car hacking on cheap, so the expensive tools do not fit on our list. I have already written in detail about the cheap and free alternative for these expensive CAN communication tools. Tools like can-utils, Wireshark works as expected. can-util works great! but SavvyCAN provides a lot more extra features. For beginners, it offers a nice GUI, which helps you easily navigate, filter the packets and arbitration IDs, etc. For those who are already into Car hacking, SavvyCAN offers really great features. My personal favorite features include the ability to perform scripting on CAN frames, Fuzzing and several RE tools bundled together to make SavvyCAN really great.
Let’s look at the definition of SavvyCAN from their website.
“SavvyCAN is a cross platform QT based C++ program. It is a CAN bus reverse engineering and capture tool. It was originally written to utilize EVTV hardware such as the EVTVDue and CANDue hardware. It has since expanded to be able to use any socketCAN compatible device as well as the Macchina M2 and Teensy 3.x boards. It can capture and send to multiple buses and CAN capture devices at once.”
More: https://www.savvycan.com/
I find it really easy using SavvyCAN rather than can-utils. Again, let’s not start the debate between which tool is better and which is not, as long as it serves your purpose, you should be good to go. Most importantly, there must be other really great tools, which I might have never explored, feel free to comment down if you are aware of any other tools.
SavvyCAN installation
SavvyCAN installation is a really easy and straightforward process. You can download the prebuilt binaries for Linux, Mac, and windows from https://www.savvycan.com
Installation and running in Ubuntu
wget https://github.com/collin80/SavvyCAN/releases/download/V199.1/SavvyCAN-305dafd-x86_64.AppImage
Installation is not required as you are downloading the app image binaries, make it executable and run it!
chmod 744 SavvyCAN-305dafd-x86_64.AppImage
# and
./SavvyCAN-305dafd-x86_64.AppImage
You should be able to run SavvyCAN

You can play around with the SavvyCAN interface for a while. If you want to use SavvyCAN with Macchina M2 or any other compatible hardware, you don’t need any extra installation.
We intend to use SavvyCAN with ICSim, so we need to install qtserialbus.
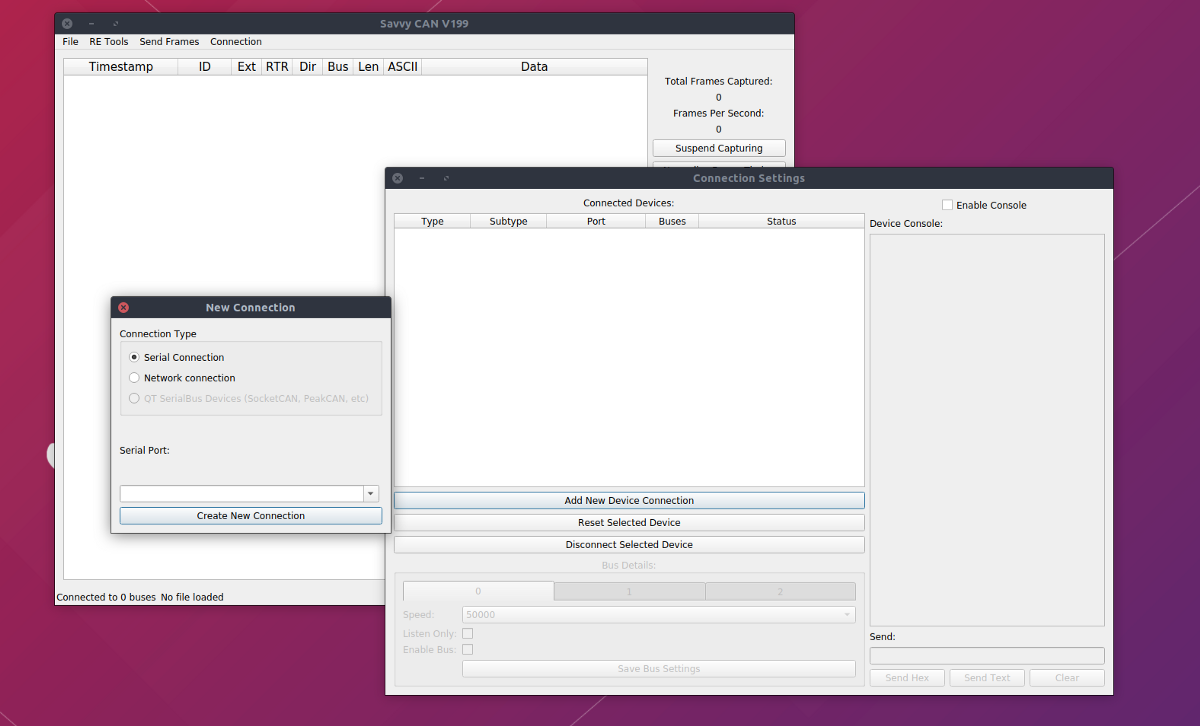
Once you open the SavvyCAN window, If you navigate to Connection -> Open Connection Window -> Add New Connection, you can observe that the qtserialbus is disabled.
Let’s begin with the installation of qtserialbus so that we can use this with ICSim.
Installing qt5
$ wget https://download.qt.io/official_releases/qt/5.14/5.14.4/qt-opensource-linux-x64-5.14.2.run
Once you have successfully downloaded qt5, we need to install/execute
$ chmod a+x ./qt-opensource-linux-x64-5.14.2.run
$ sudo ./qt-opensource-linux-x64-5.14.2.run
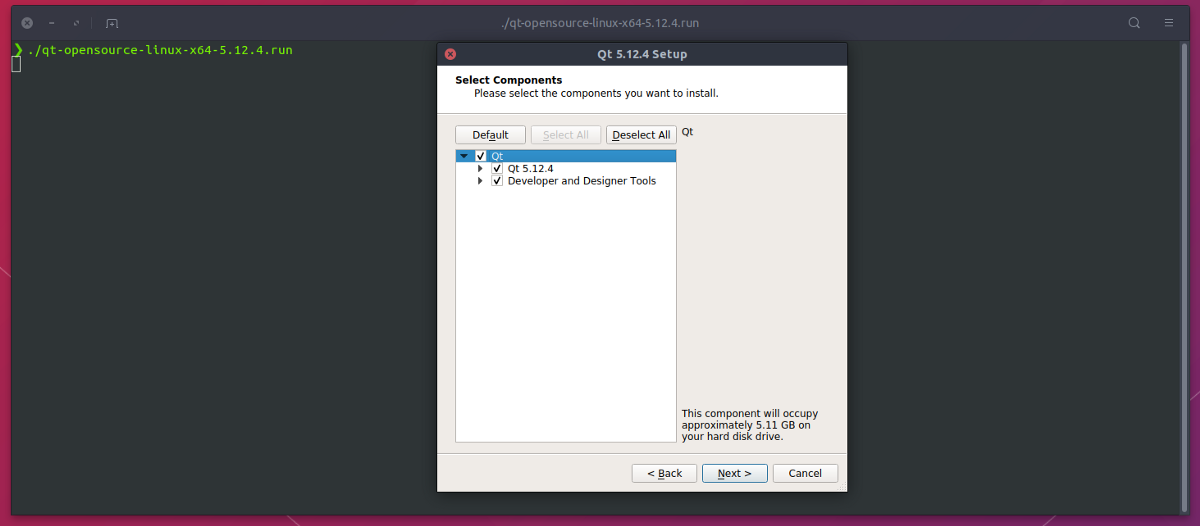

Please note down the pathname, you will need this later.
Once qt5 is installed, you need to install qtserialbus, as this is not included in the official apt repository of Ubuntu. So we need to build this ourselves.
Install qtserialbus
$ sudo apt install qtdeclarative5-dev qttools5-dev g++
$ git clone https://github.com/qt/qtserialbus
$ cd qtserialbus
$ /home/y0g3sh/Qt5.14.2/5.14.2/gcc_64/bin/qmake .
$ make
$ sudo make install
Build SavvyCAN
In order to use qtserialbus, the SavvyCAN’s AppImage file that we downloaded earlier will not work. SavvyCAN has to be built with qmake.
$ git clone https://github.com/collin80/SavvyCAN
$ cd SavvyCAN
$ /home/y0g3sh/Qt5.14.2/5.14.2/gcc_64/bin/qmake CONFIG+=debug
$ make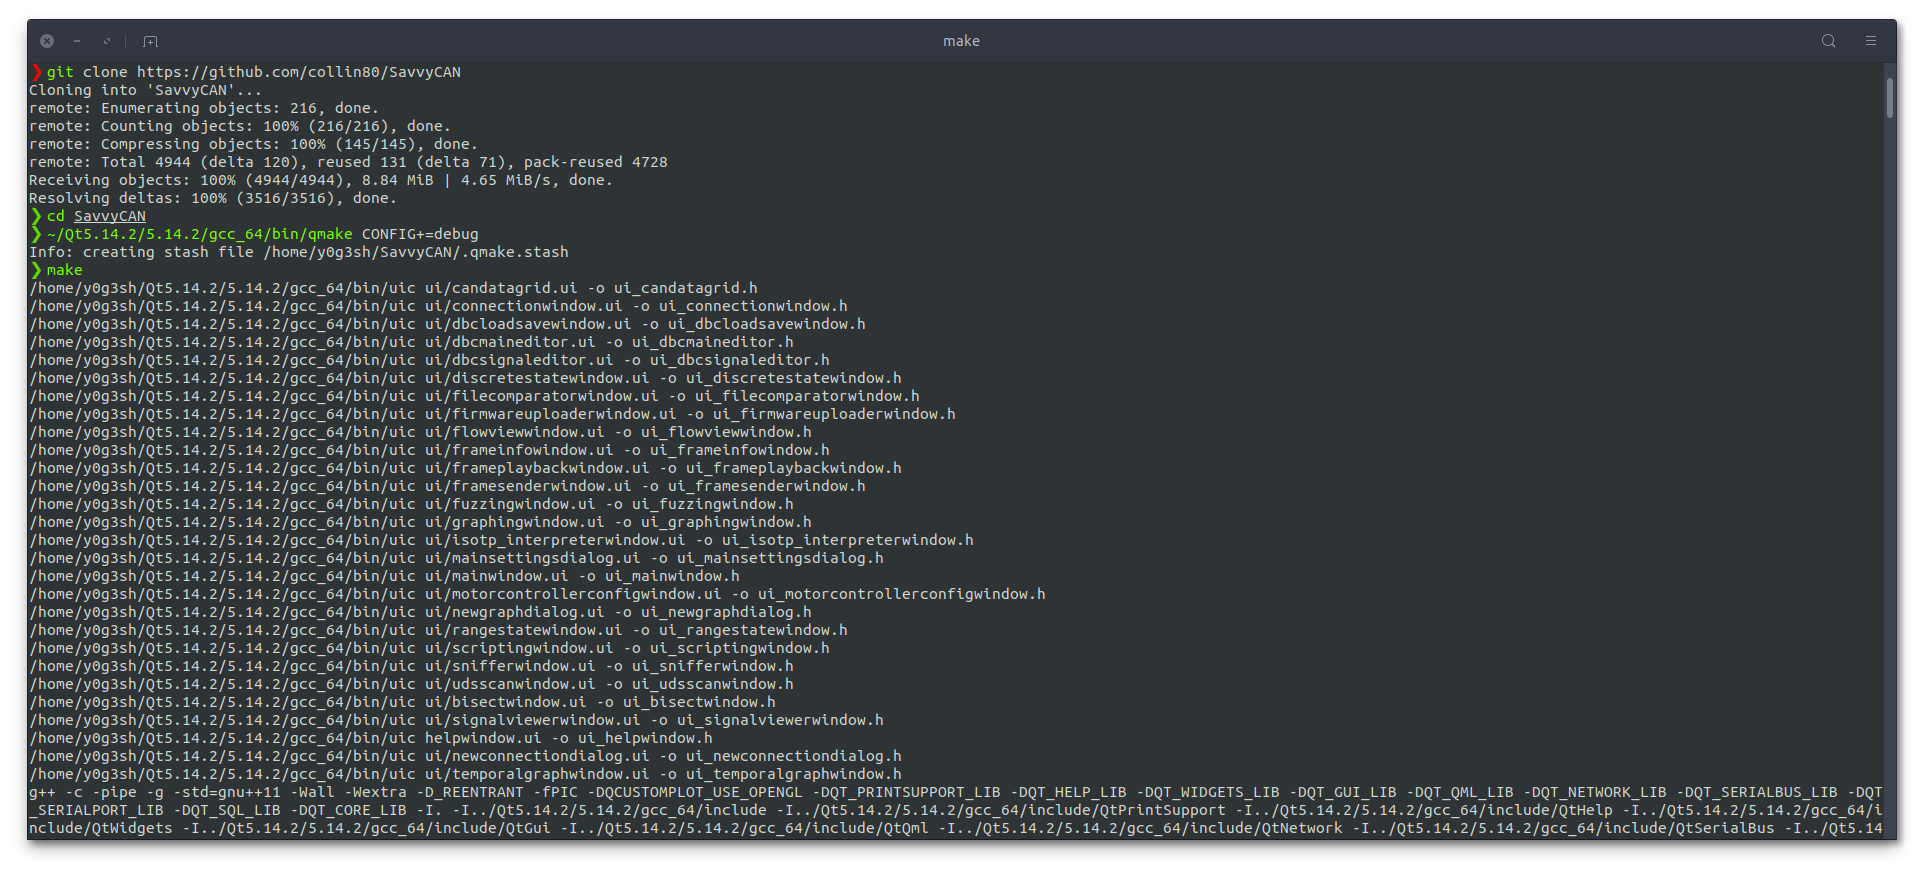
This will take some time to build.
Once everything is installed, start the ICSim simulator, start everything except can-utils. Instead of using can-utils to capture CAN communication, we will use SocketCAN.
Starting the SavvyCAN
Please launch the SavvyCAN binary we just built rather than the appimage we downloaded earlier. Remember, if you want to perform this on a real car and not use it with qtserialbus, you can continue to use those appimage binaries and need not go through all this hassle of building SavvyCAN yourself.
$ cd SavvyCAN
$ ./SavvyCAN
Now you can open the connection window and observe that the QT SerialBus has been enabled.
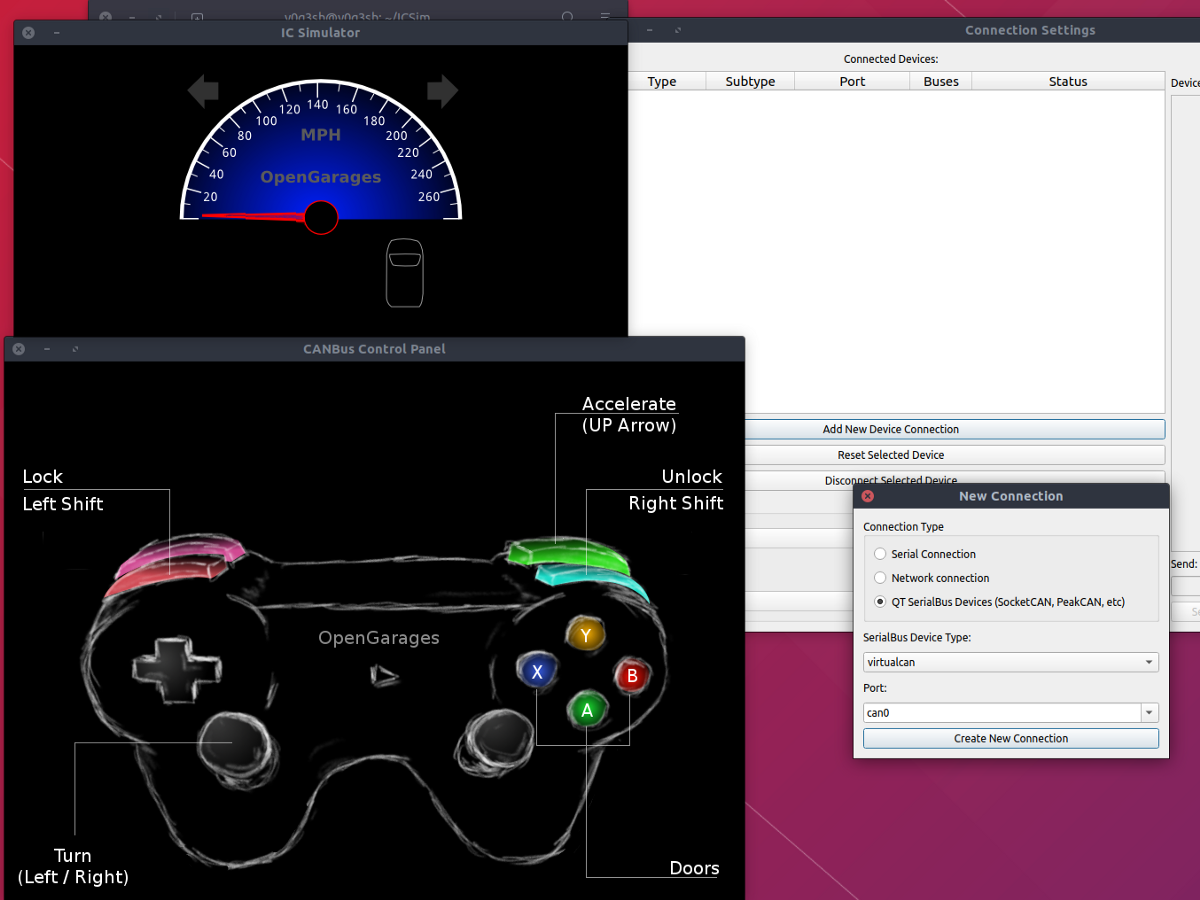
Adding vcan0 to SocketCAN
To make a new connection in SavvyCAN,
- Open the SavvyCAN
- Goto Connection menu -> Open Connection Window -> Add New Device Connection
- Choose the connection with the following setting
Connection Type as QT SerialBus Devices
SerialBus Device Type as socketcan
Port as vcan0
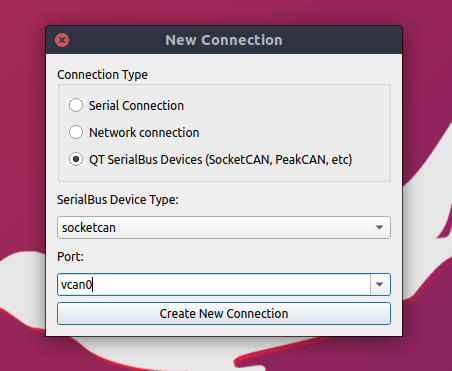
Then, create a new connection.
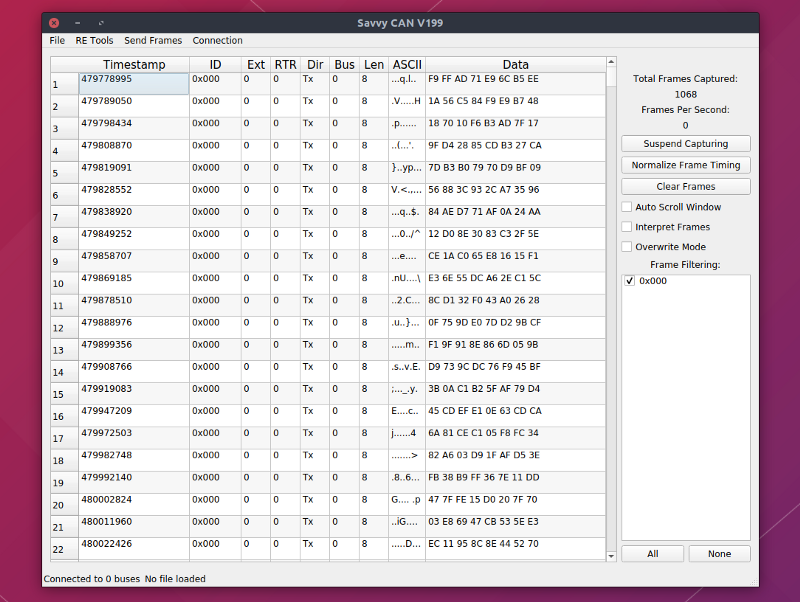
As soon as the connection is done, you can see the CAN frames flying around in the SavvyCAN window, which is a good sign that everything is working well and good.
In order to understand the SavvyCAN better, let’s do the same things we did earlier using can-utils, but this time with SavvyCAN.
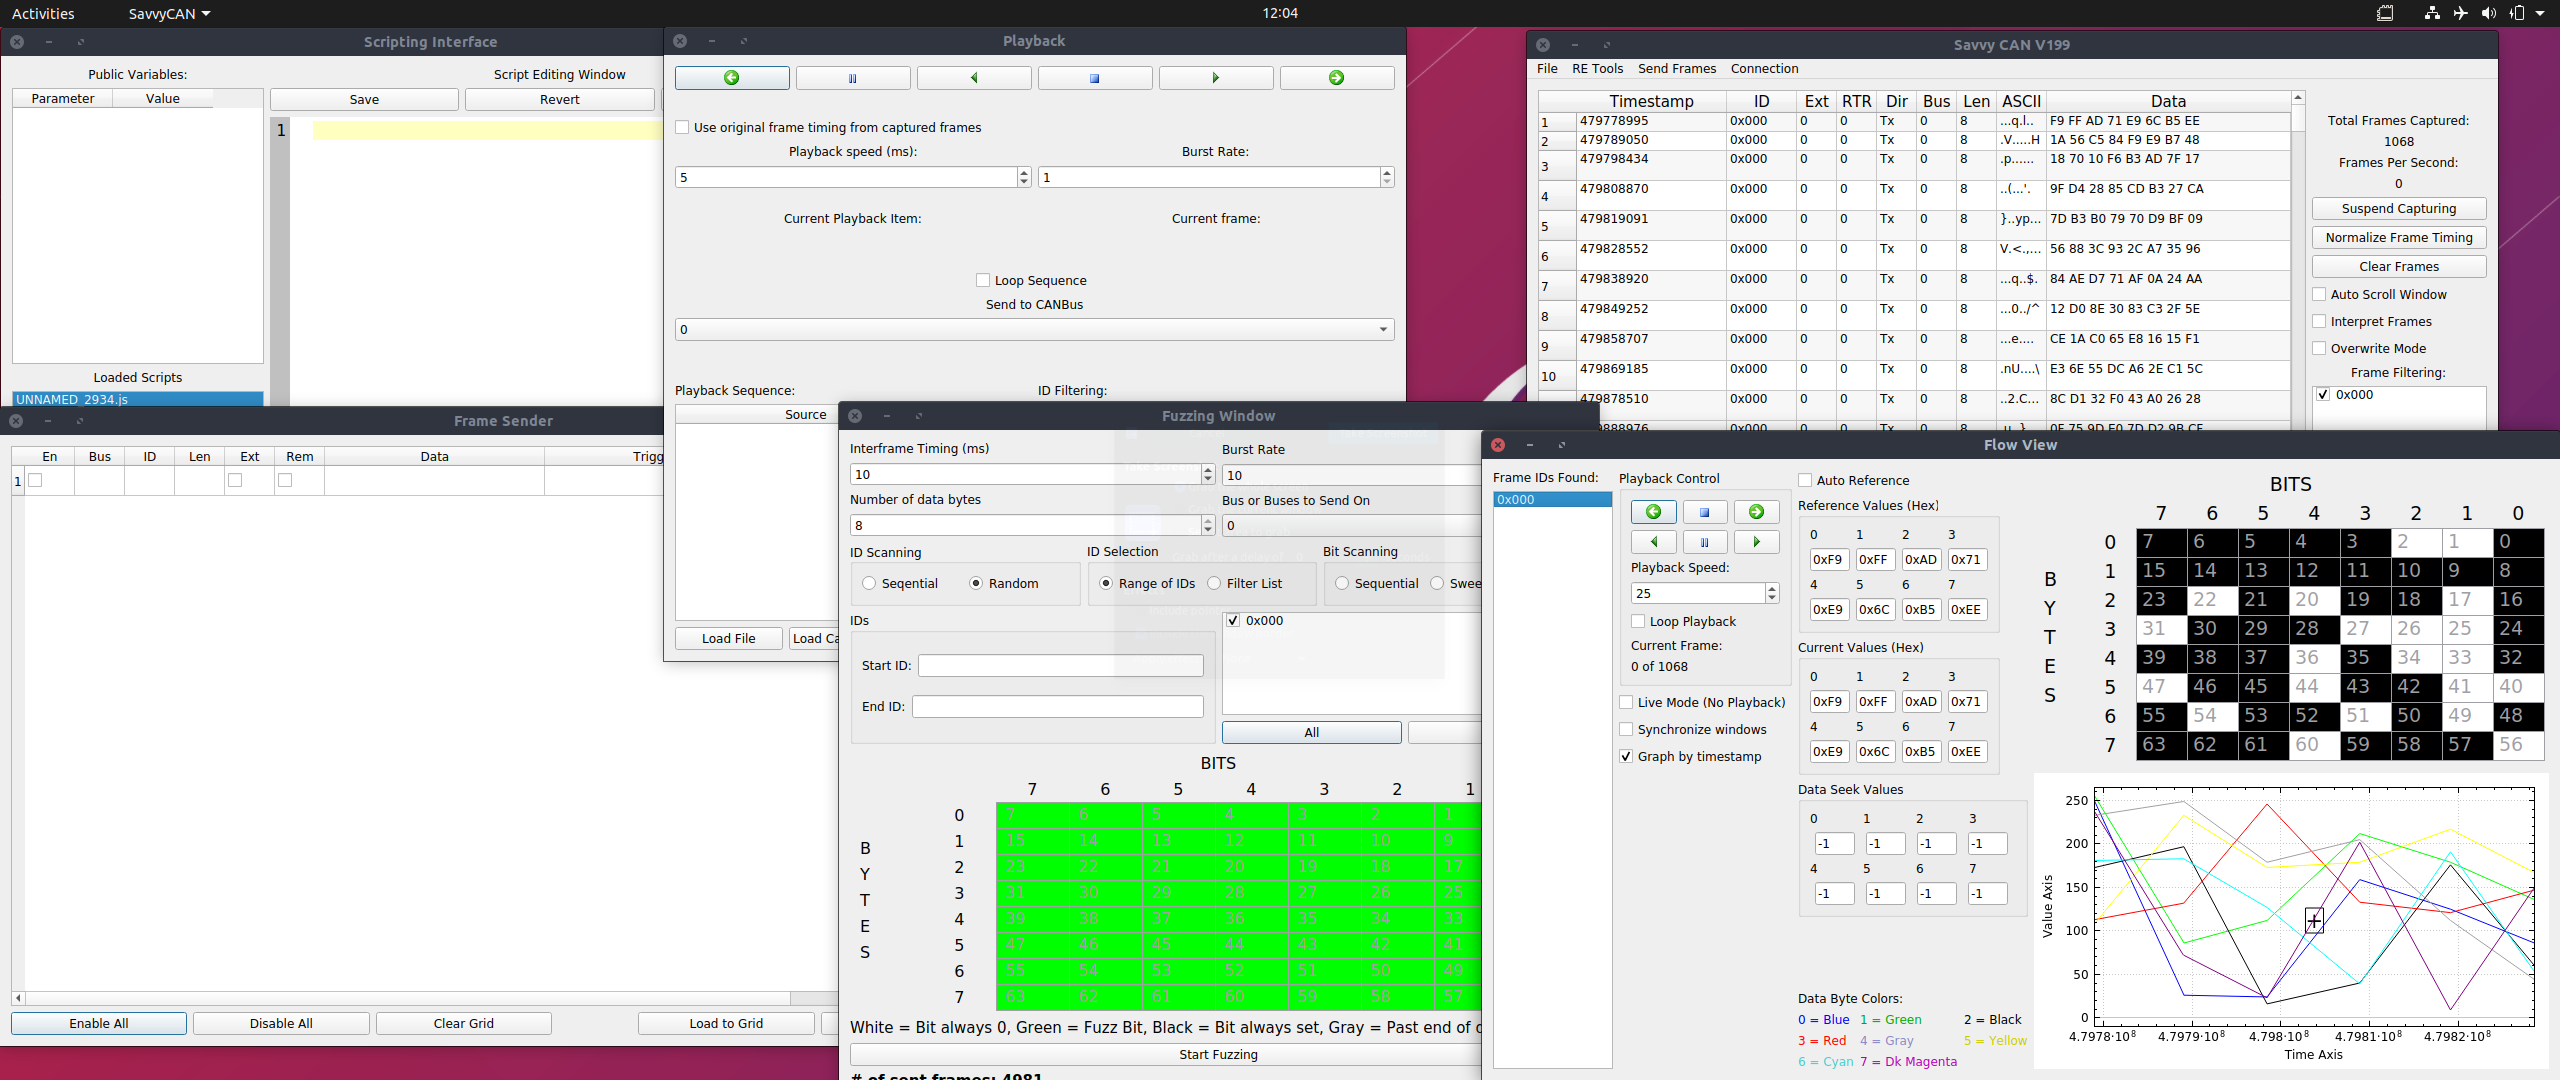
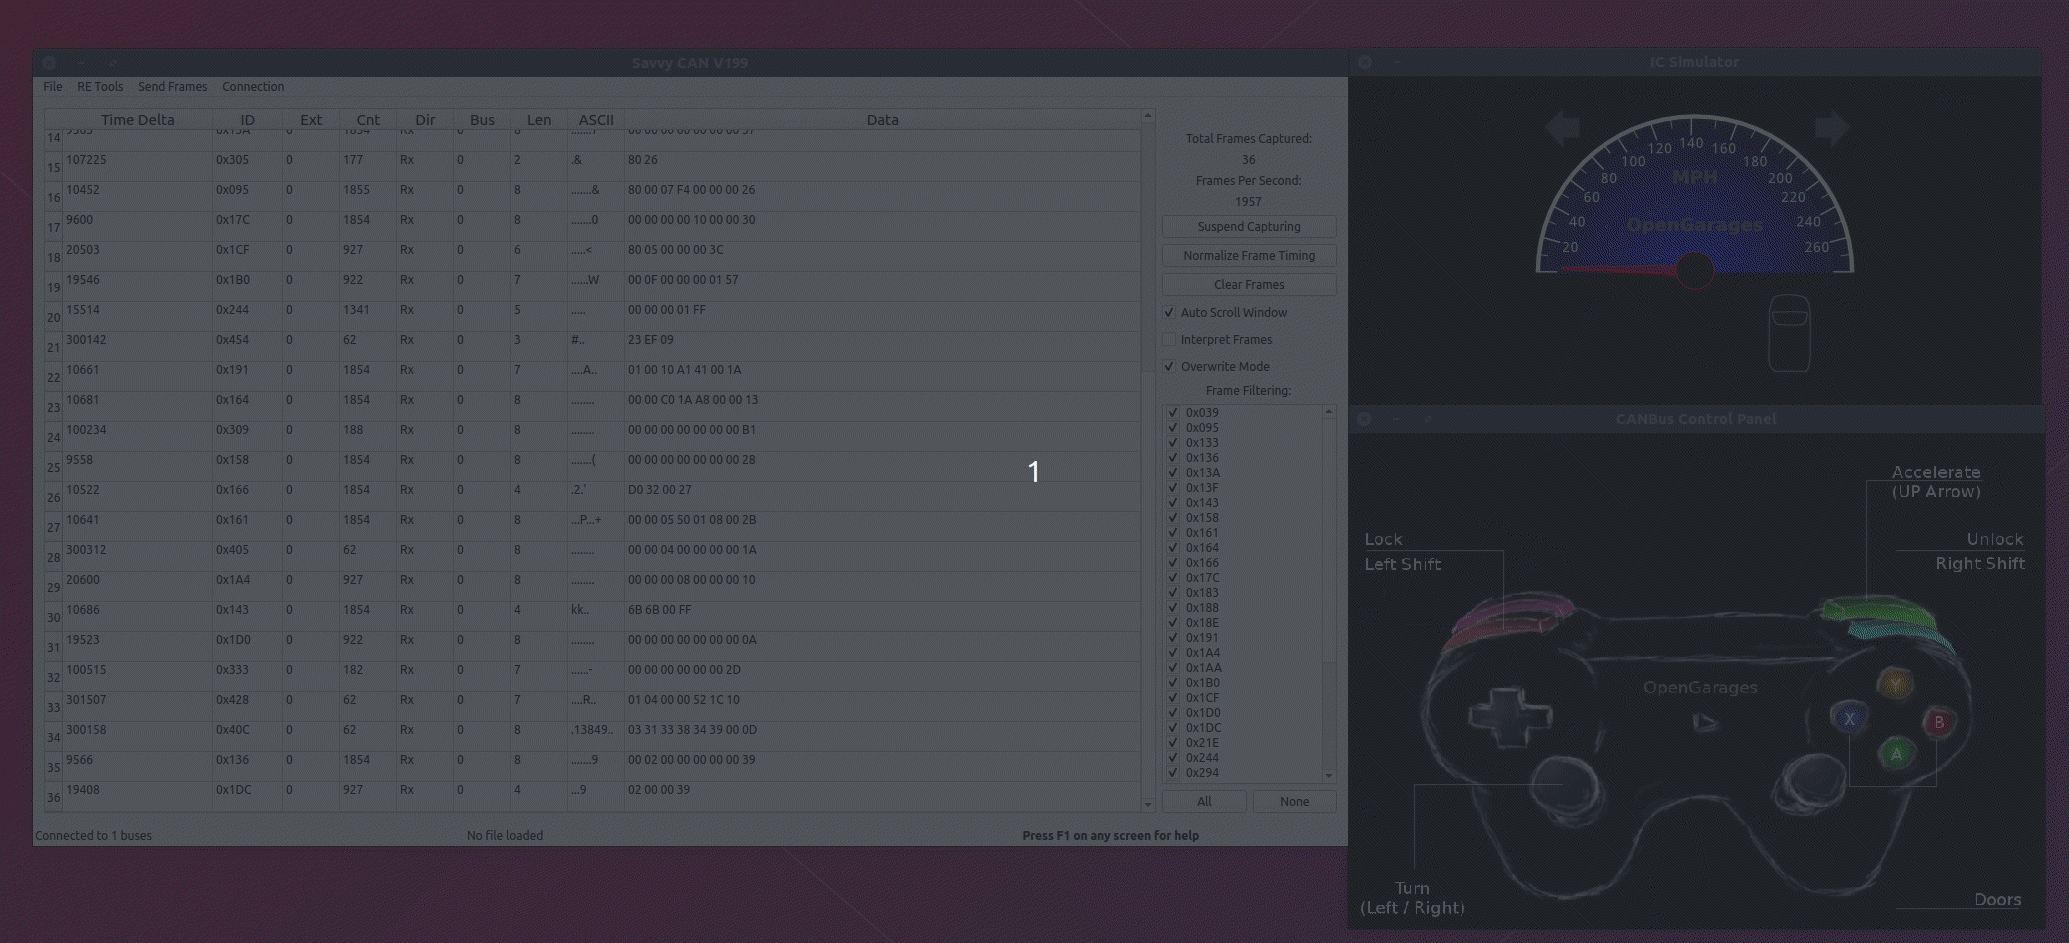
SavvyCAN provides nice and intuitive interface to filter the frames by ID. You can uncheck the IDs that you don’t require, from the right pane. This way you can quickly identify the ID associated. Another really cool feature is ”Overwrite mode”. If this option is enabled, the frames will overwrite on the same row.
Replay Attack
Performing a replay attack using SavvyCAN is much easier. You can open the Playback options under Send Frames menu. You can either load data from file or load directly from the captured data. You can also choose which ID to replay from ID filtering menu.
Identifying the arbitration ID
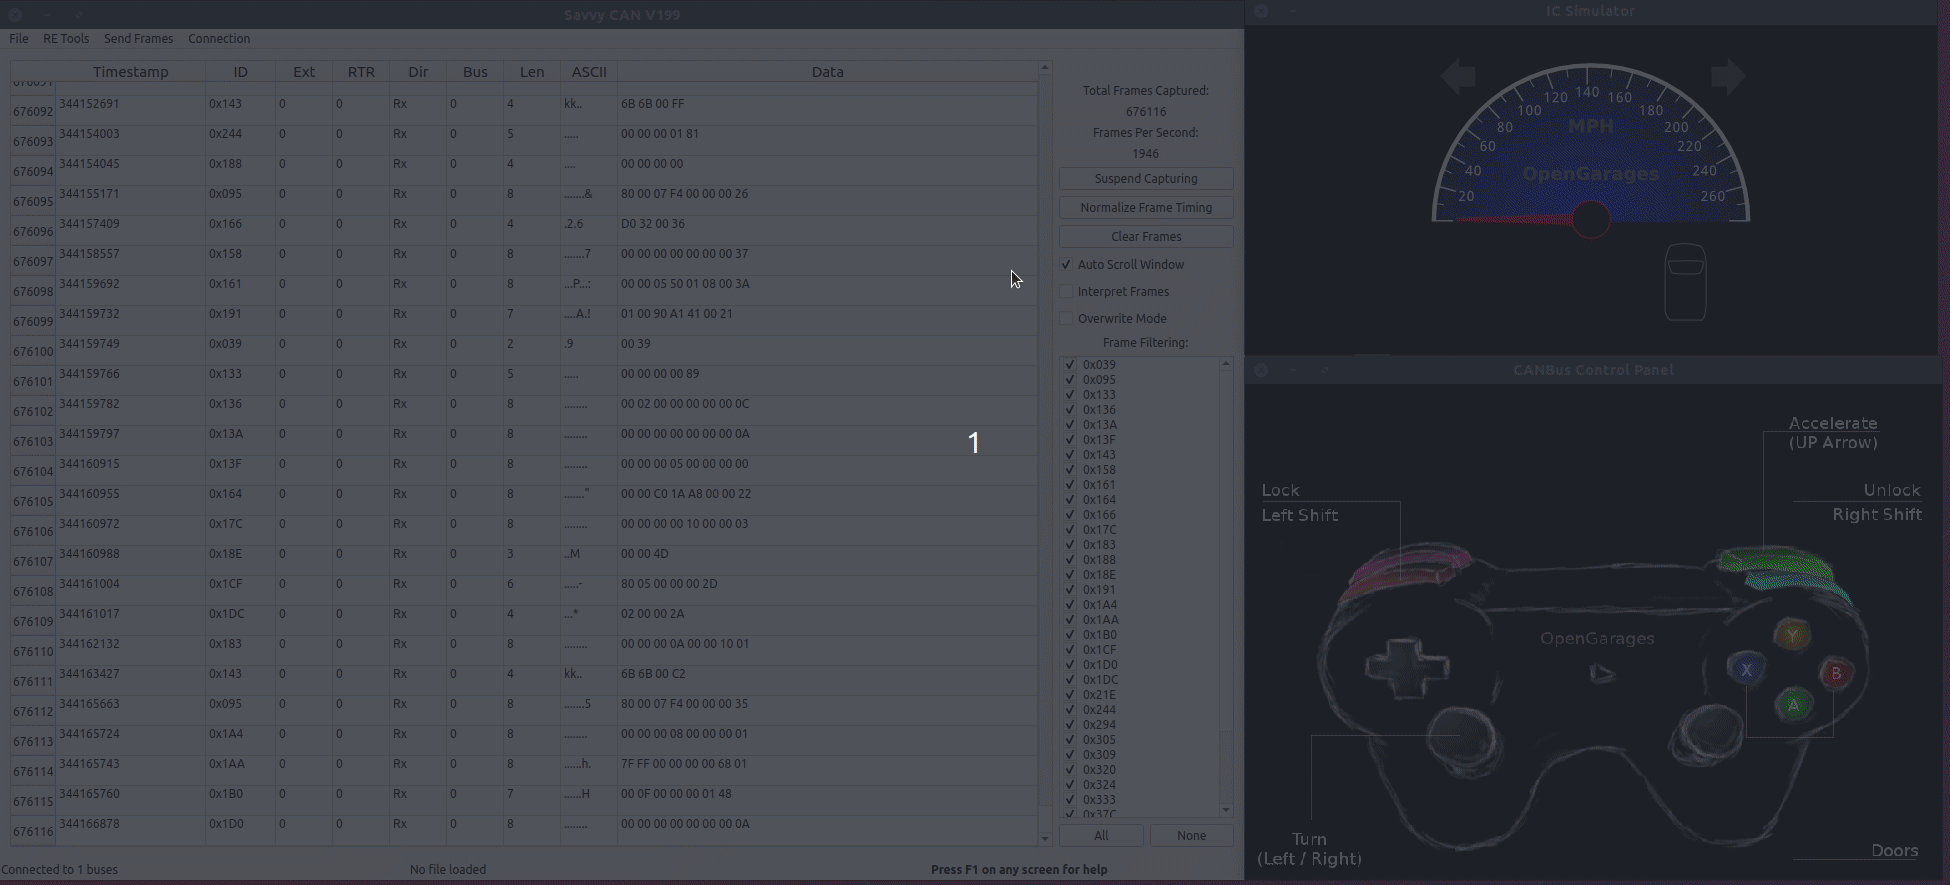
I get asked this question a lot, on how to identify which ID does what on a car. Finding arbitration ID can sometimes be very tricky. SavvyCAN provides many RE tools. One of which I use frequently is “Sniffer”. This allows me to fade the inactive bytes and identify the IDs quickly. For example, let’s try to identify the ID for Tachometer. To identify the tachometer ID, I will open the Sniffer and Fade the inactive bytes. The way I identify is, let’s assume if there are 20 IDs available. I disable at least one third of them — perform the action on car/ICSim— observe the change in frames. I do this until I am left out with single ID.
Let’s see Sniffer, one of the RE tools of SavvyCAN in action.
Here I did not find any change in the bytes that corresponds to my action. So I will move for another half of IDs.
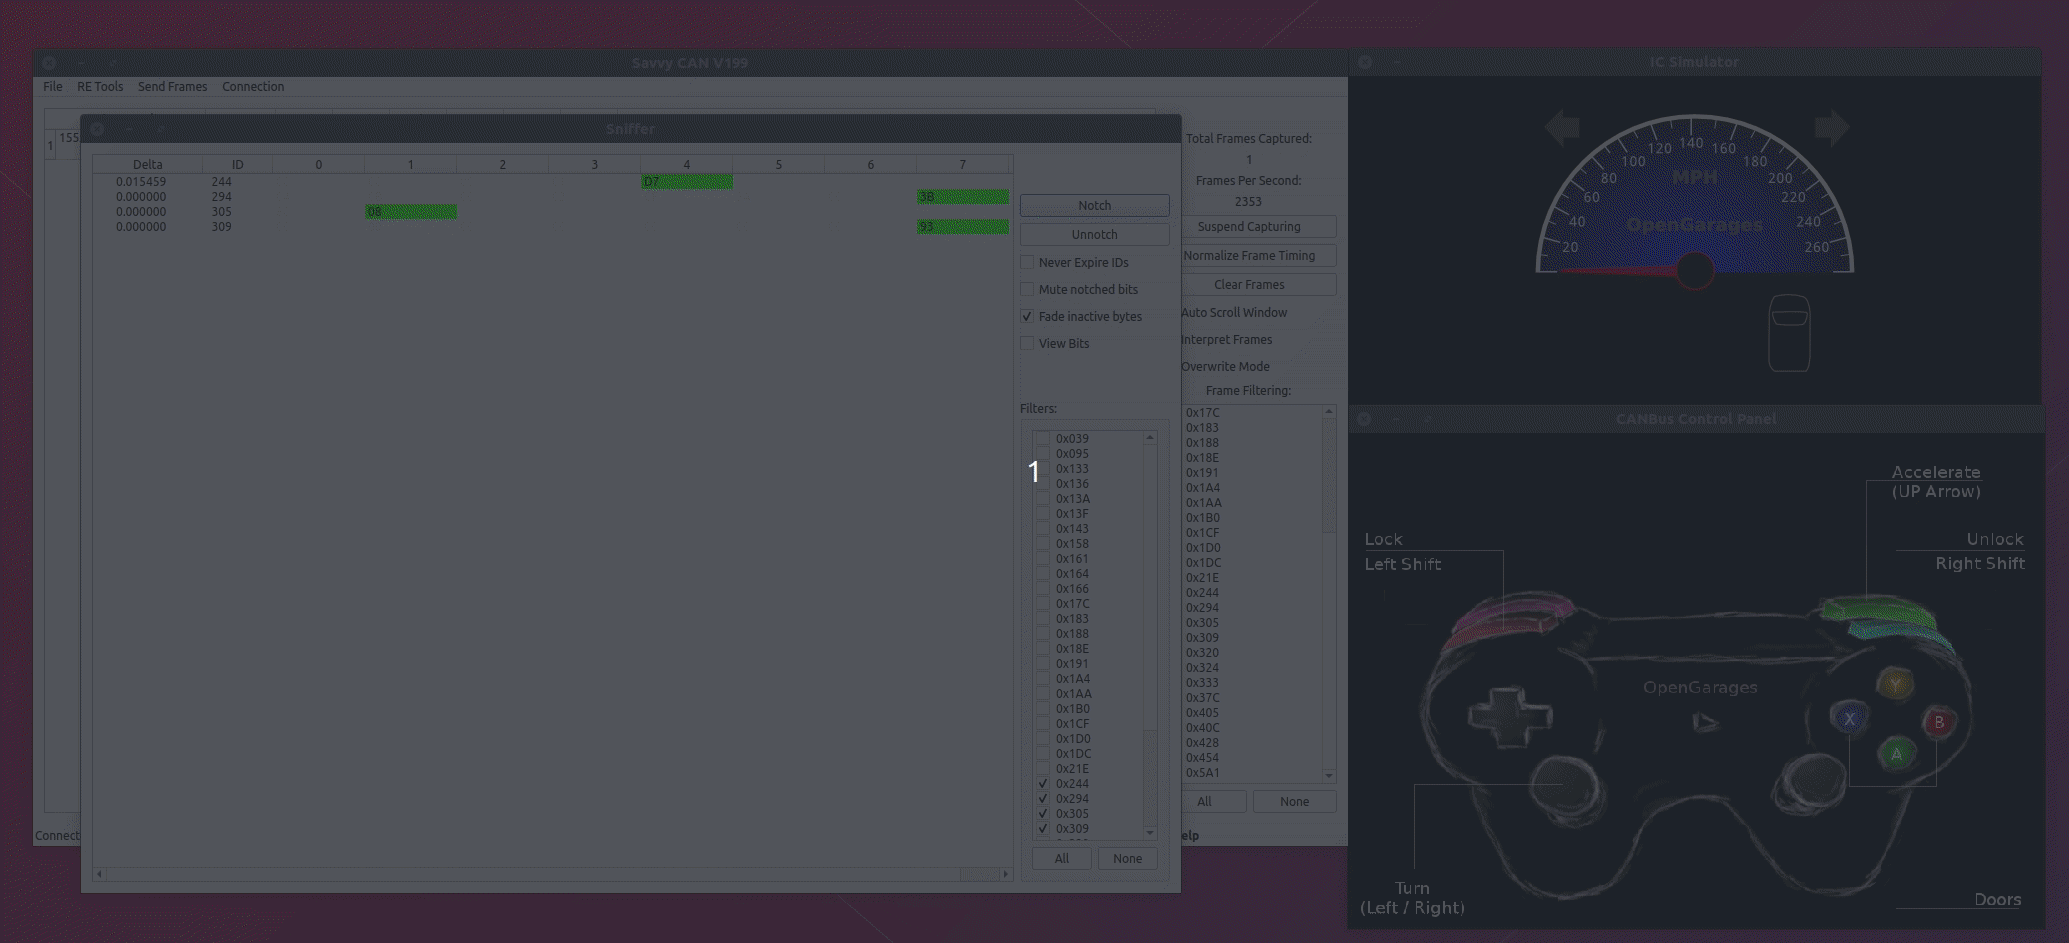
Looks like 0x244 is what we are looking for. You can observe the pattern in the change bytes when throttle is hit. As the speed increases, the tachometer displays the change in 3rd and 4th byte (counting from Zeroth Byte)
You can do this for all the actions available in ICSim.
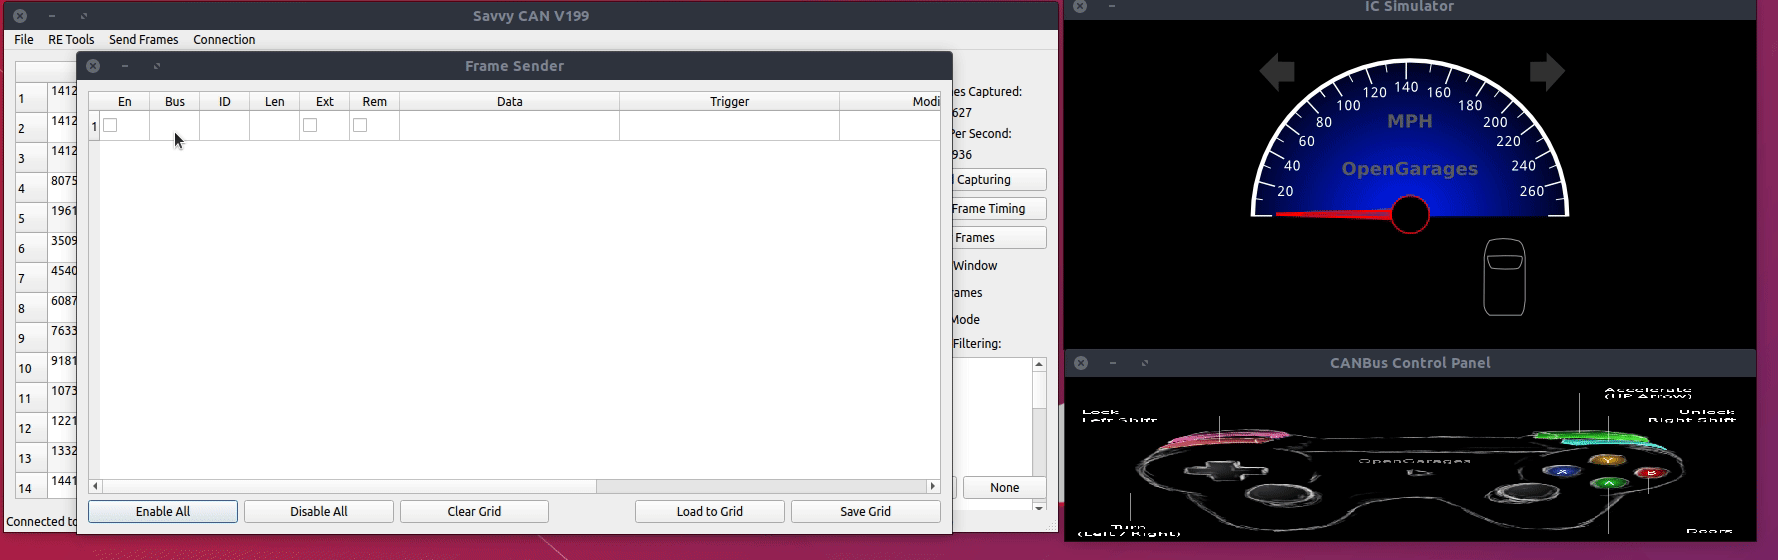
Sending Custom frames
SavvyCAN also has another cool feature where you can modify the packets on the fly while sending custom frames. To be able to do this, You need to open Frame Sender from inside the Send Frames menu. Let’s spoof the tachometer. From the above example when we sniffed the packets, you would have observed how tachometer works. The 3rd and 4th Bytes increases with increase in throttle. So what we will do is, send the custom frame, modify the bytes on the fly to observe the change in tachometer.
The data column will consist of hex values, the ID should be in the format of 0x123, trigger must be the value in ms, the delay between each frames, and modification should consist of modification on bytes.
Example what I would like to do is, I want to send on Bus 0, ID 0x244 (tachometer), data as 0x00 0x00 0x00 0x00 0x00 and increase the 3rd byte by 2 every time, so on the modification, you could easily write d3=d3+2. Once done, make sure to check on Enable (EN) checkbox.
Fuzzing
The another really cool feature about SavvyCAN is that, how easy is it to fuzz around CAN frames.
I made a quick video as it was easy explaining on video on how to fuzz.
I hope you enjoyed these articles. Thank you!