
I recently started getting excited about IoT Security and making devices behave differently than what they were normally expected to do. And to do this, I needed a device. I was wondering which device should I purchase in order to hack! I then decided to buy this MiBand 3.
This article was originally Published in Medium: https://medium.com/@yogeshojha/i-hacked-xiaomi-miband-3-and-here-is-how-i-did-it-43d68c272391
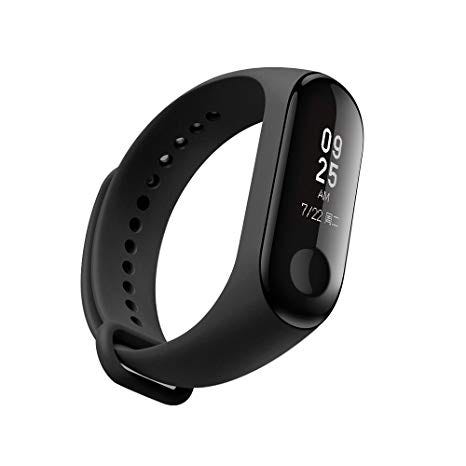
As soon as I got my MiBand 3, I was excited to hack this.
This is going to be a detailed write-up on How I hacked MiBand 3 so that I could control it from Linux and send some unexpected phone call notification , sms notification on MiBand 3 and also changing the date and time.
Let’s Begin. But before that,
My Aim?
I wanted to send surprising notifications and gather data from Mi-band even though if I am not the owner of the device.
As I knew that Mi-band connects to your phone/Fitness App via Bluetooth, I started learning about the theory on Bluetooth. I never had any prior experience working on Bluetooth devices. So I thought of going through the basics of How this wireless technology works.
Bluetooth has two major class, Bluetooth Classic and Bluetooth Low Energy (BLE). Let me explain the basic difference between these in layman’s term. Bluetooth classic is great for products that requires continuous streaming of data. This was basically designed for continuous two way transfer of data with very high application throughput and is highly effective for applications like your Bluetooth headphone and speakers.
Now comes, Bluetooth Low Energy, it is designed for application that do not require continuous data streaming, maybe just send on or off to your “Smart” bulb? The main advantage of BLE over classic is ultra low power consumption, since it is designed to operate in sleep mode and waken up only when connection is initiated. Long story short, BLE is ideal for application which do not require continuous data transfer but highly dependent on battery life.
Many IoT and “Smart” appliances use BLE because of ultra-low power consumption and easy to implement.
But said that, it’s not perfect! It has some flaws. Almost all the time, it is discoverable, works on the same frequency and same channel always! And almost at any point in time, it allows any devices to connect to it.
BLE is based on a specification called General Attribute Profile (GATT), which defines how communication/data transfer between client and server. These short piece of information that is being sent and received are called attributes.
BLE has few key concepts, such as profiles, services & characteristics.
Services: They are set of provided features and associated behaviors to interact with the peripheral. Each service contains a collection of characteristics.
Characteristics: Characteristics are defined attribute types that contain a single logical value. Check this out: Bluetooth Characteristics
I think, this much theory is enough to understand how BLE works 😀
Let’s move on.
I initially started by scanning available Bluetooth devices in the vicinity using hcitool. hcitoolcomes preinstalled in Ubuntu with bluez stack and you can consider as the Swiss army knife for Bluetooth in Linux.

If your device is advertising then it must show up here.
Now, we need to know how exactly mobile application and mi band are interacting with each other. For that we need to analyze the packets.
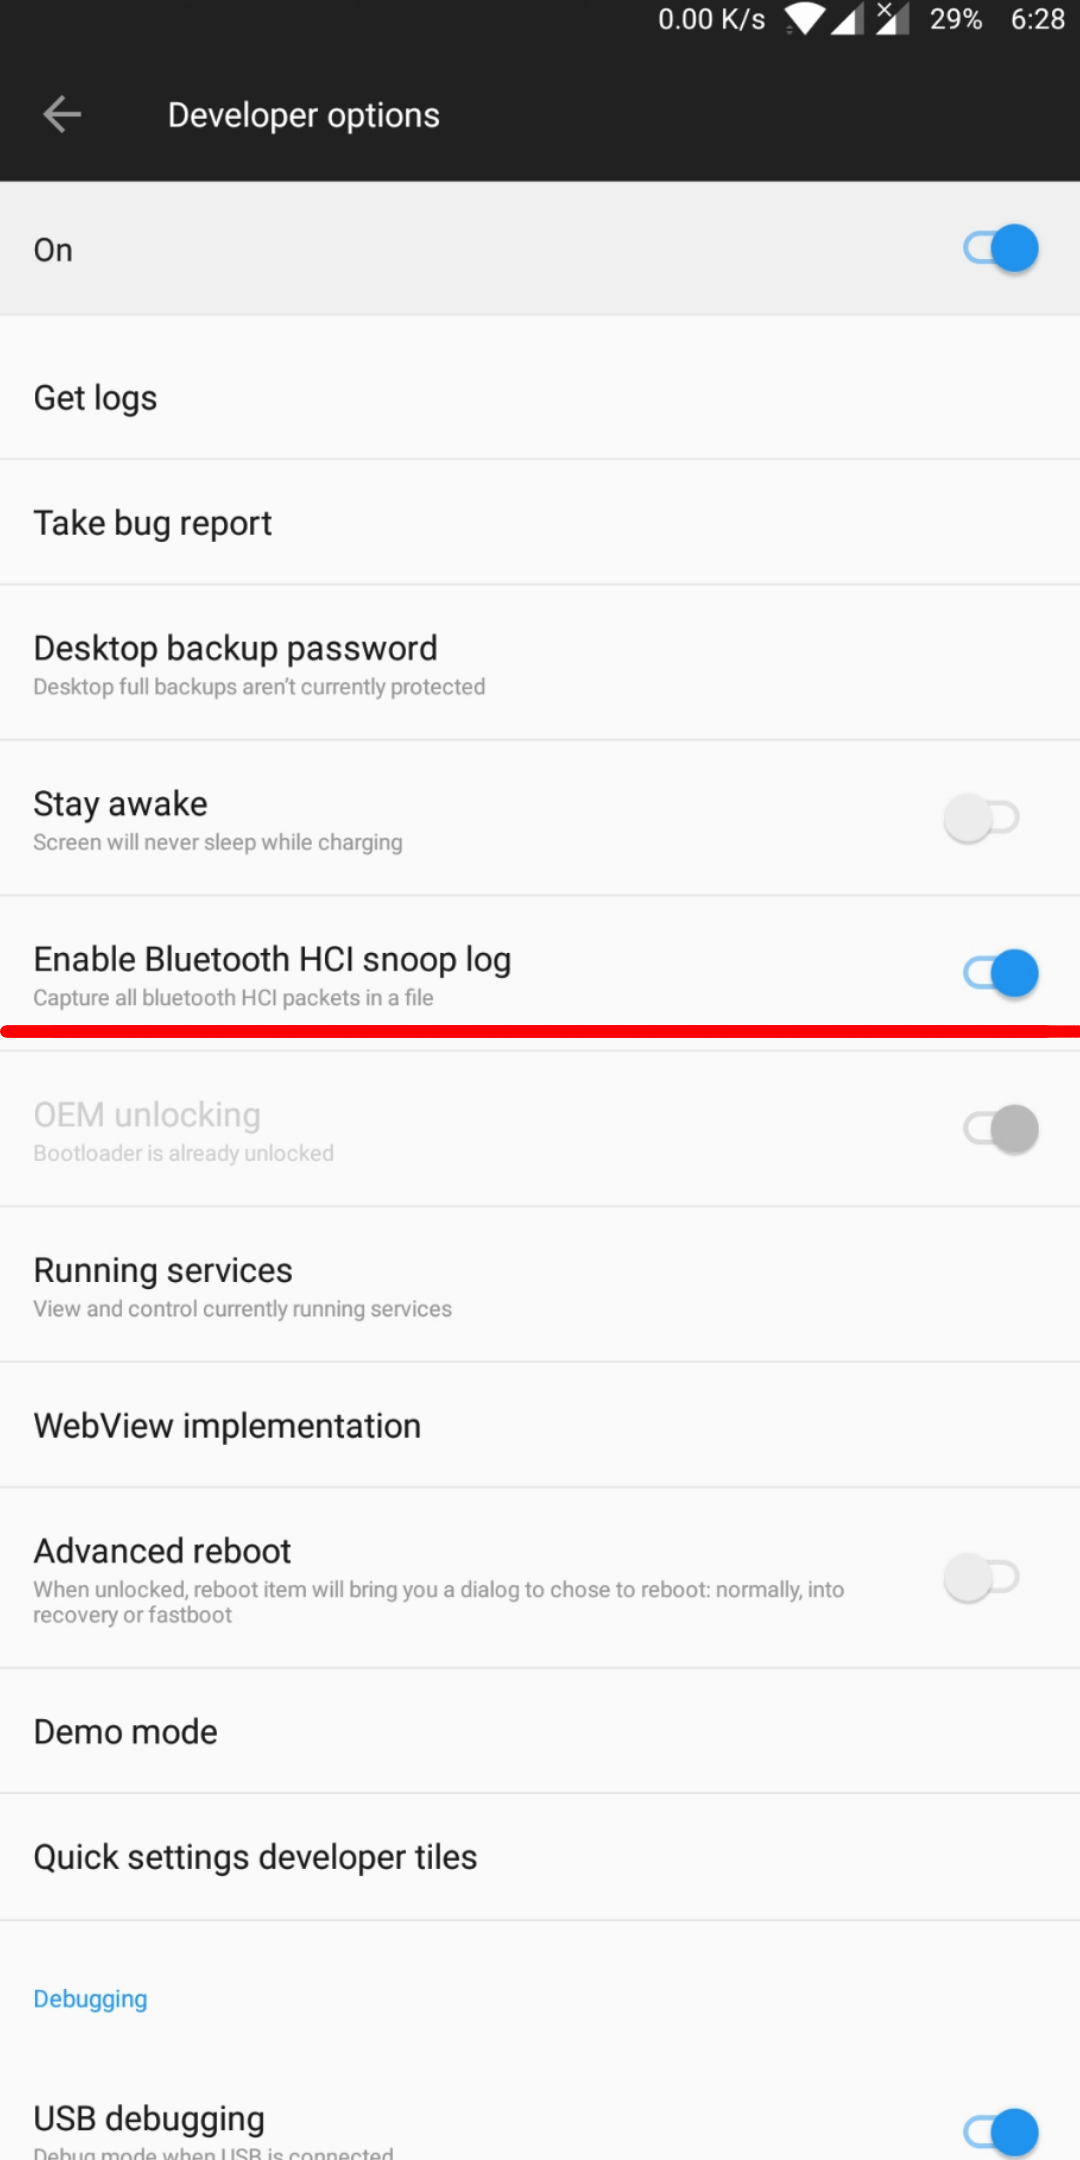
In android, there is an option available to capture all the Bluetooth packets in a file. For that go to Settings -> Developer Settings -> Enable Bluetooth HCI snoop log.
Similarly for debugging BLE device, there is an app available in Google Play Store, called nRF Connect, download & install the app.
And you are good to go!
So, next step was to pair the watch, and send some fake notifications. Now that, I sent some fake notification and also performed some actions, the log was captured. I then transferred log file to my computer so that I could analyze from tools like Wireshark. The log will be available /sdcard/btsnoop_hci.log, now for some unknown reasons oneplus keeps in /sdcard/oem_log/btsnoop/. :D
Now here is the simple command in adb, if you wanted to pull the file to your computer. Connect both using a usb cable and run this command
adb pull /sdcard/oem_log/btsnoop/<your log file>.log
Now lets open the file in wireshark and analyze it.
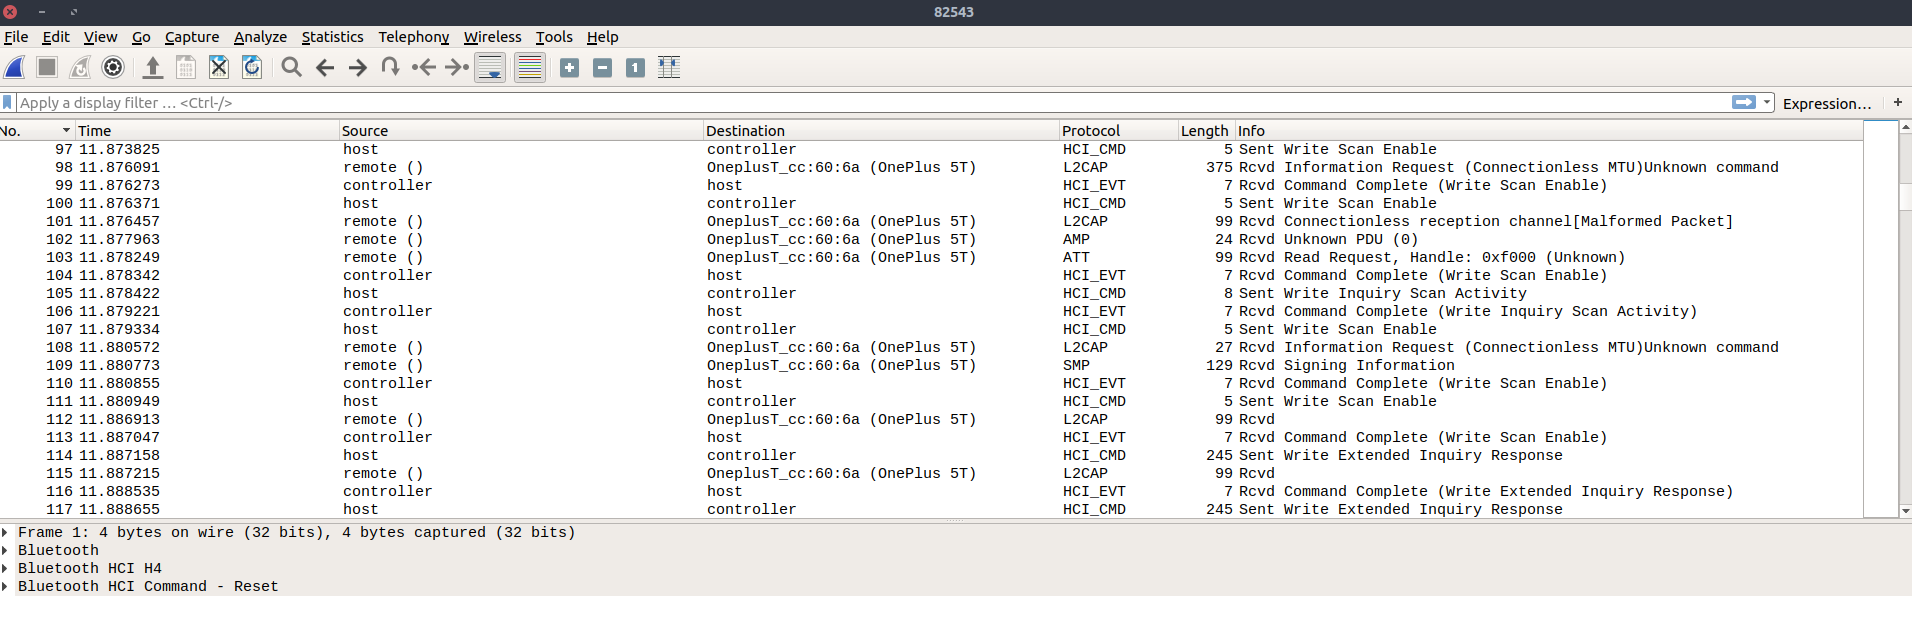
You will probably end up getting hundreds of packets there and analyzing all of them wont be very easy. So I was concerned only with the protocol. And I realized that there were AMP, ATT, HCI_CMD, HCI_EVENT, L2CAP, SMP available in the log file. A simple google search made me realize that ATT protocol is what I need. ATT protocol is used for writing data to miBand. Finding the right packet may take some time.
Now for packets with source as your phone. destination as your mi band mac address, go through the packets and your will see that on particular handle the notification was written. Note down the handle, you will need it later.
You may get handle as 0x0050, that is the Company identifier. Depending on your Bluetooth device, you may get different handle. You can verify your Company identifier here. https://www.bluetooth.com/specifications/assigned-numbers/company-identifiers
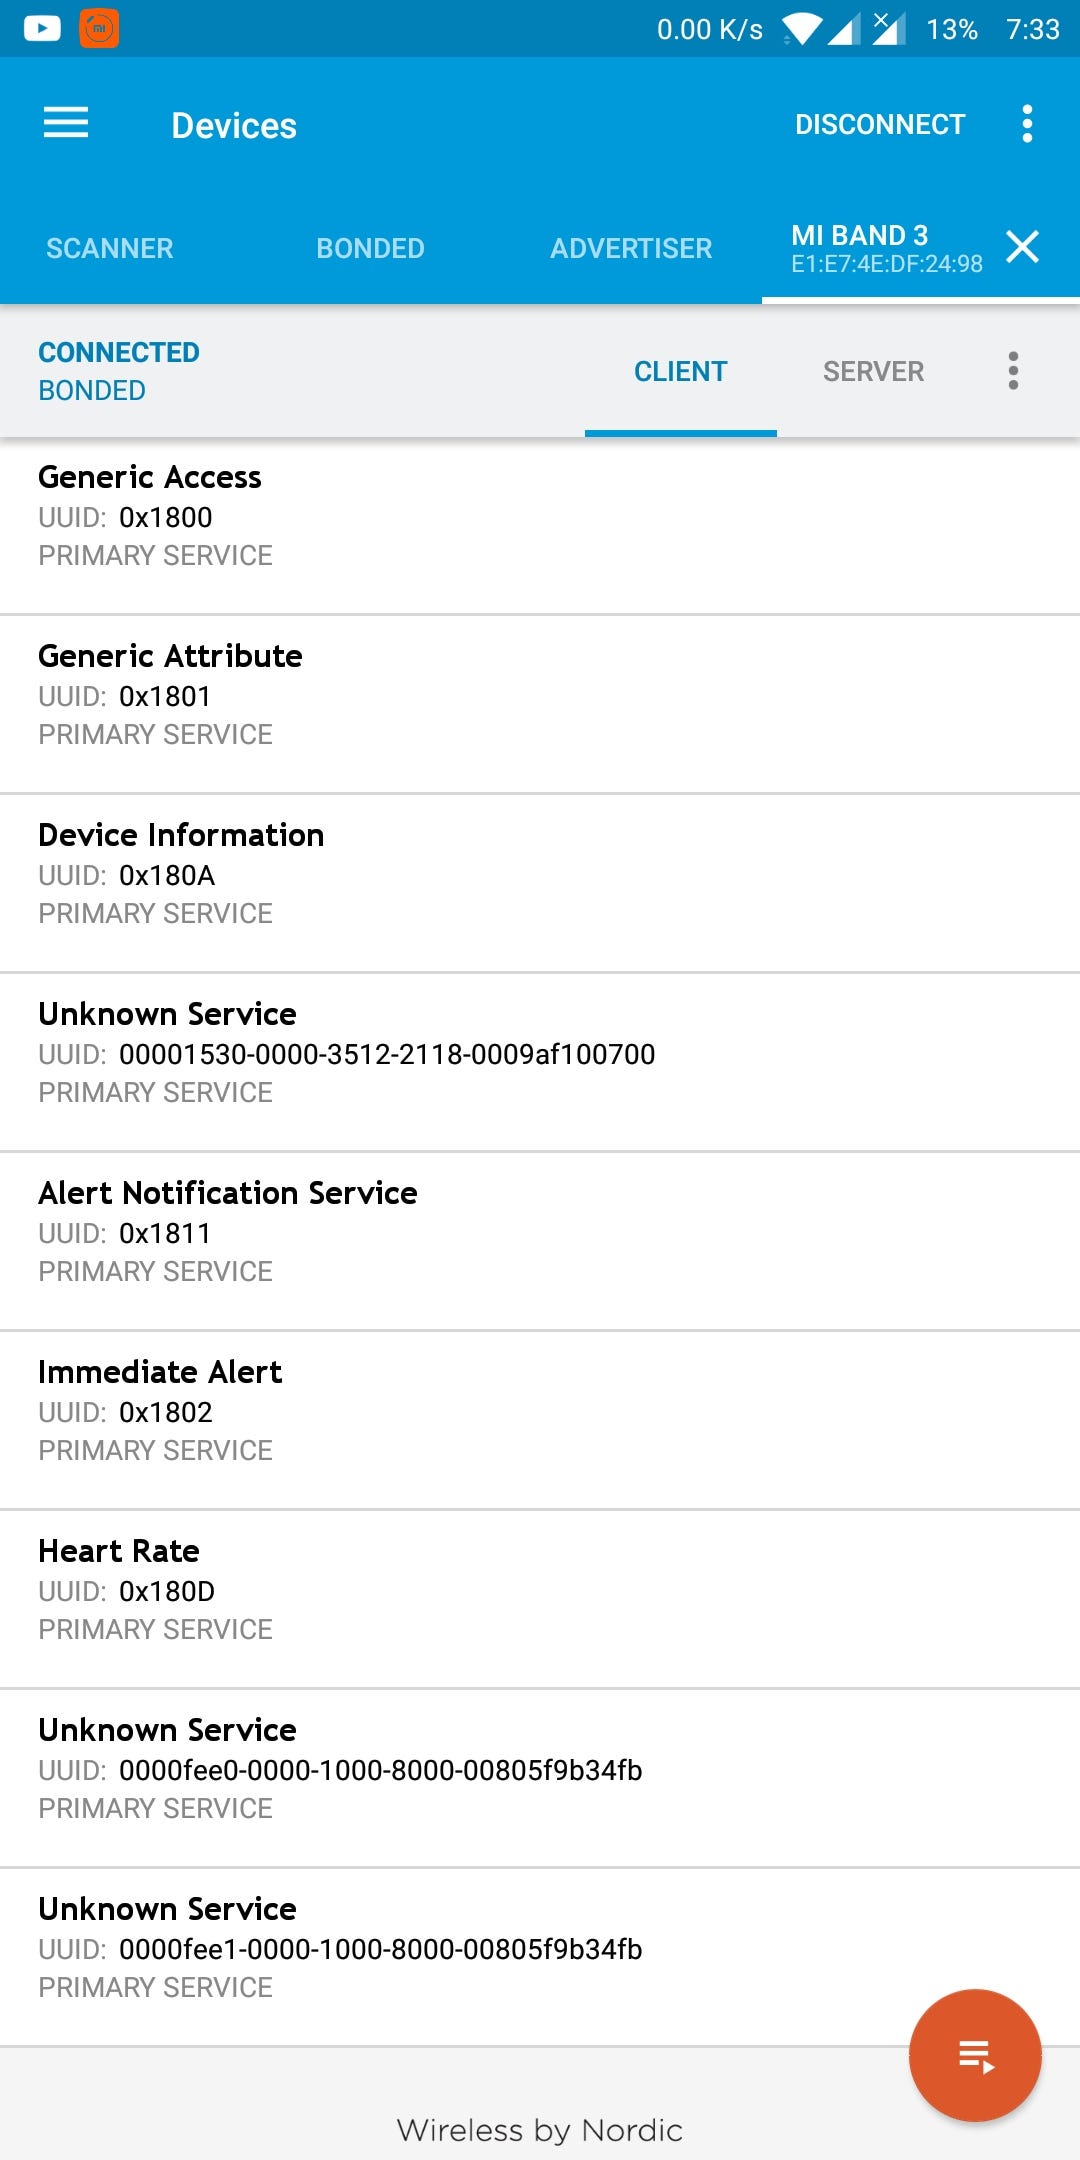
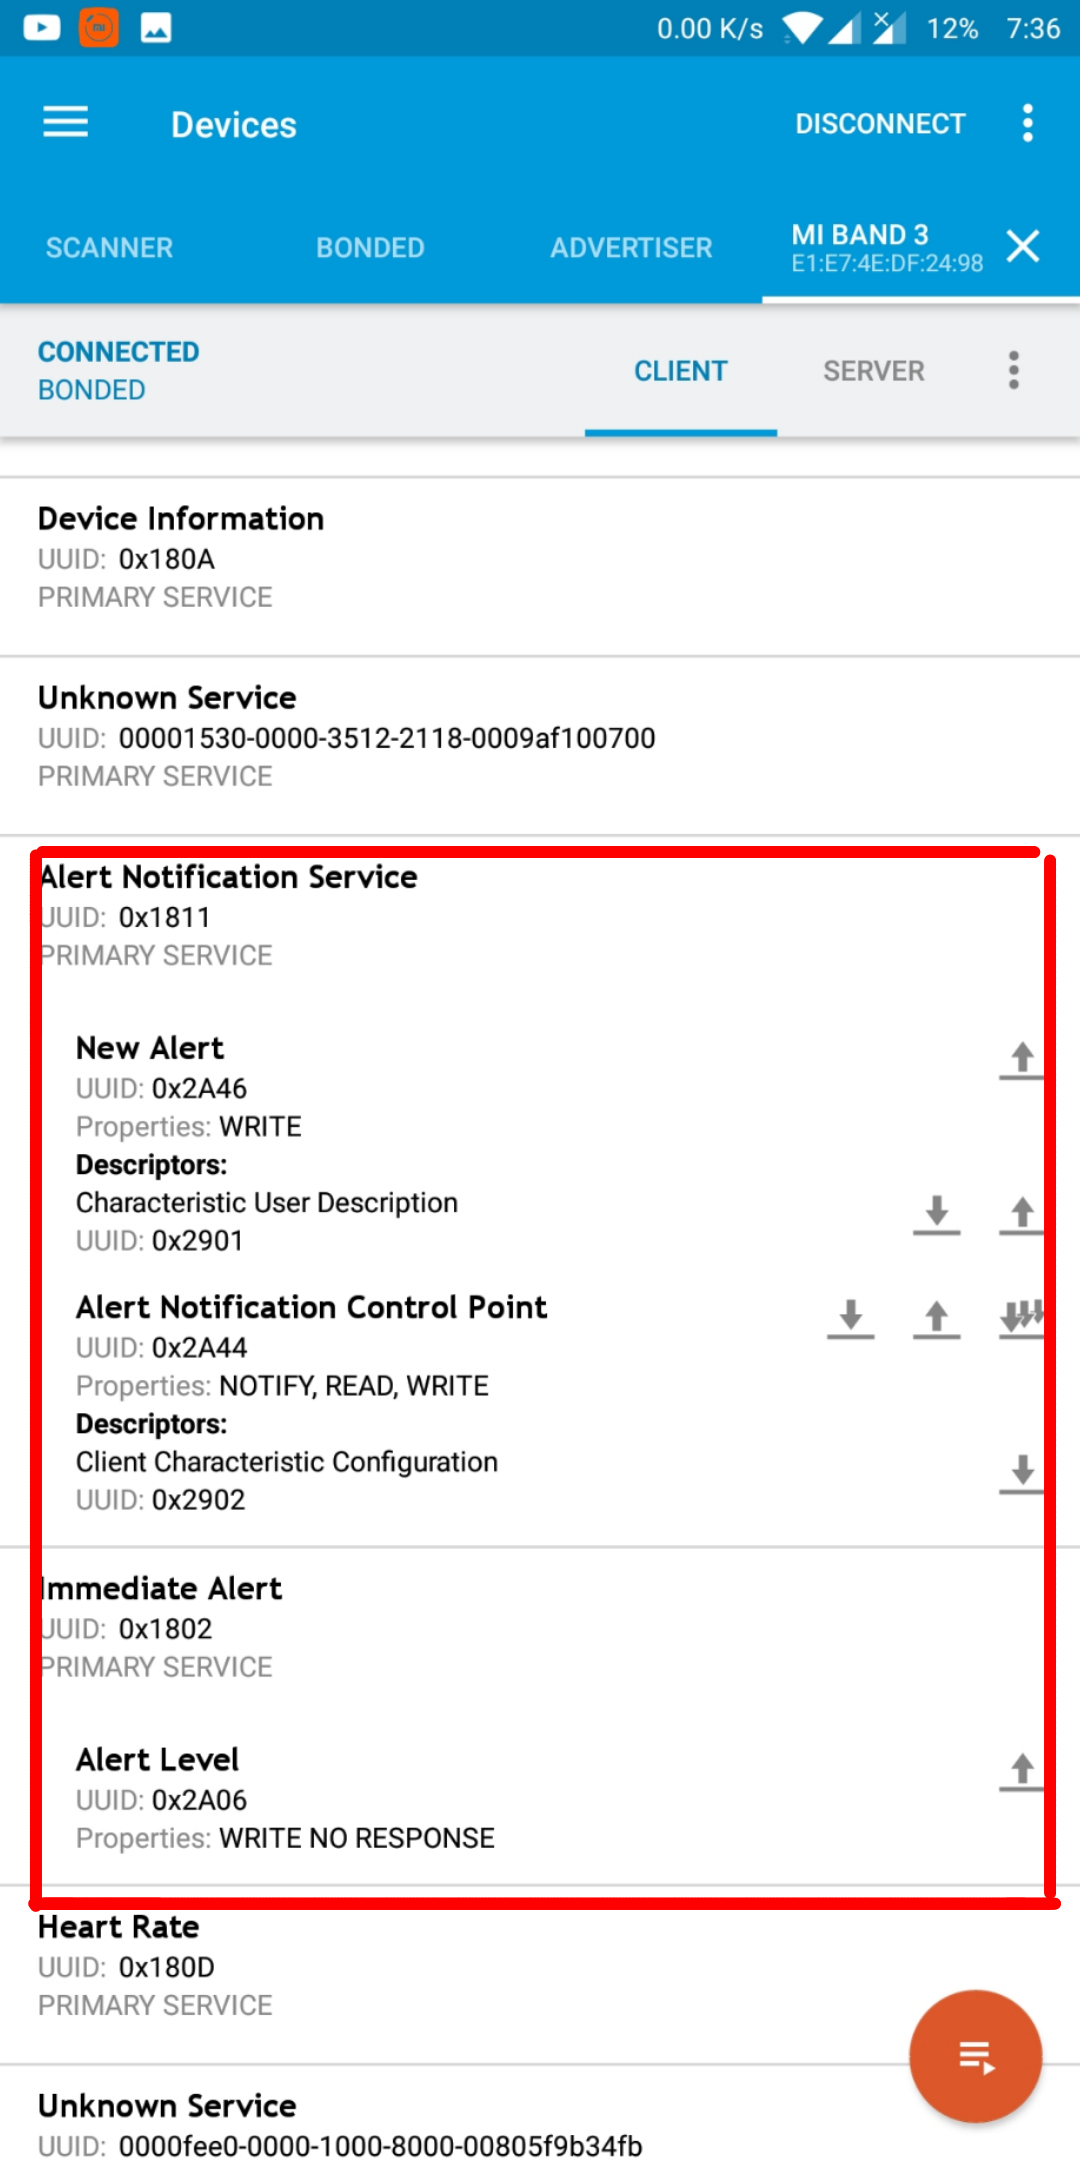
Now lets open the nrf Connect app, connect it with your mi band. You will see all the UUID, Services and Characteristic.
These two services made me excited again. I got the service UUIDs, properties etc.
I then started connecting the MiBand with my computer using gattool.
sudo gatttool -b E1:E7:4E:DF:24:98 -I -t random
Let me explain you all these parameters.
-b is for device mac address, your miBand mac address
-I is for interactive mode
-t is for address type.
Once you type the above command, you can connect to the miband using connect command.

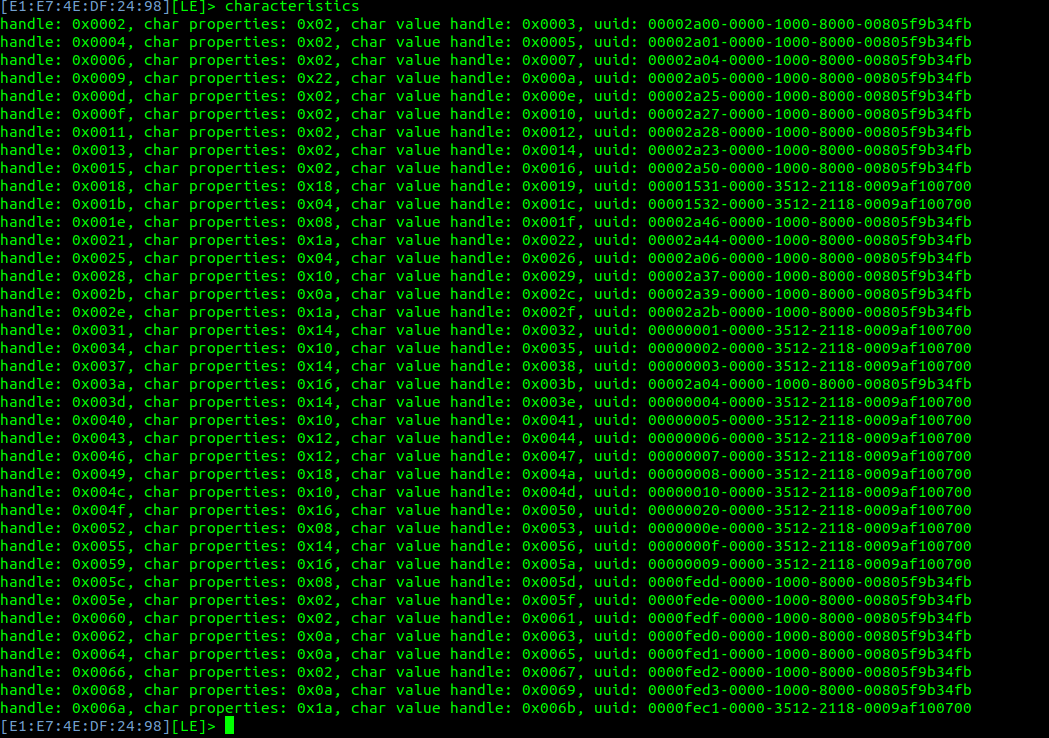
After connecting, you can list down all primary services and characteristic using primary and characteristic command. You must have uuid and handle for these services in order to perform any action like reading sensor data or writing the data.
List down all primary services

List down all characteristics
As I had UUIDs, I was super excited to throw notifications on my mi Band 😀 But I didn’t know which handle/uuid was for notification. I started brute forcing 😀 I tried writing values to all the above uuid and handle.
In gattool, you have these to write the values
char-write-req <handle> <new value> Characteristic Value Write (Write Request)
char-write-cmd <handle> <new value> Characteristic Value Write (No response)
I tried every possible combination expecting mi band to either vibrate or pop up some notification 😀 and I failed miserably. On top of everything, mi band was getting disconnected every 30 seconds, I nearly gave up, but then realized that I was missing out something. Authentication. Yes, I missed authentication! Thanks to Andrey Nikishaev,
He has explained very well how mi band is being paired and authenticated. That gave me a good head start.
And here are the Authentication steps:
- Setting on auth notifications (to get a response) by sending 2 bytes request \x01\x00 to the Des.
- Send 16 bytes encryption key to the Char with a command and appending to it 2 bytes \x01\x00 + KEY.
- Requesting random key from the device with a command by sending 2 bytes \x02\x00 to the Char.
- Getting random key from the device response (last 16 bytes).
- Encrypting this random number with our 16 bytes key using the AES/ECB/NoPadding encryption algorithm (from Crypto.Cipher import AES) and send it back to the Char (\x03\x00 + encoded data)
He has an excellent library on github for miBand authentication. I used the library and mi band was authenticated to the Linux Machine.
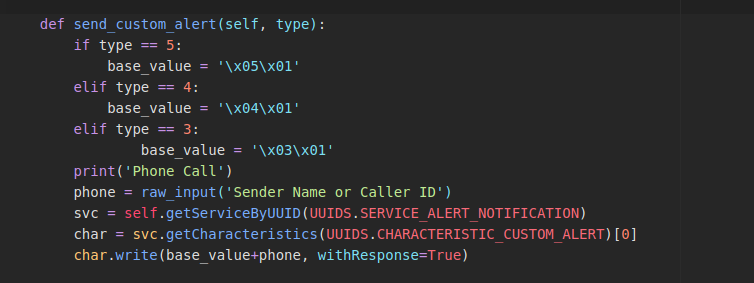
Now my aim was to send some nasty notifications to the mi band, I needed to know how exactly data is being sent.
I opened the nrfConnect and sent some call notifications to Alert Notification Service (0x1811) > New Alert (0x2A46).
I found this:

Basically it was writing the request to characteristic 00002A46–0000–1000–8000–00805f9b34fb
Let’s talk about the values here
The first two-bytes is the type of notification.
First Two Byte -> Notification Type
01 -> Email
03 -> Call
04 -> Missed Call
05 -> SMS/MMS
There are a lot more, but these many are supported by miBand.
The next two bytes are the number of alerts.
And the remaining is the hex value for the Notification Title.
Now I wrote this function in python to send a notification to miBand.
Yayy, I got the Notification on MiBand!

But there is something you need to understand. The last line char.write() has withResponse=True. Let me explain this.
I was actually sending notification without withResponse=True parameter.
The value was being written but the miBand was not showing any notification. Tried a lot but could not display any notification. I thought maybe the notification service won’t work if paired with Computer. Again I send the notification from nrfConnect app and realized something.
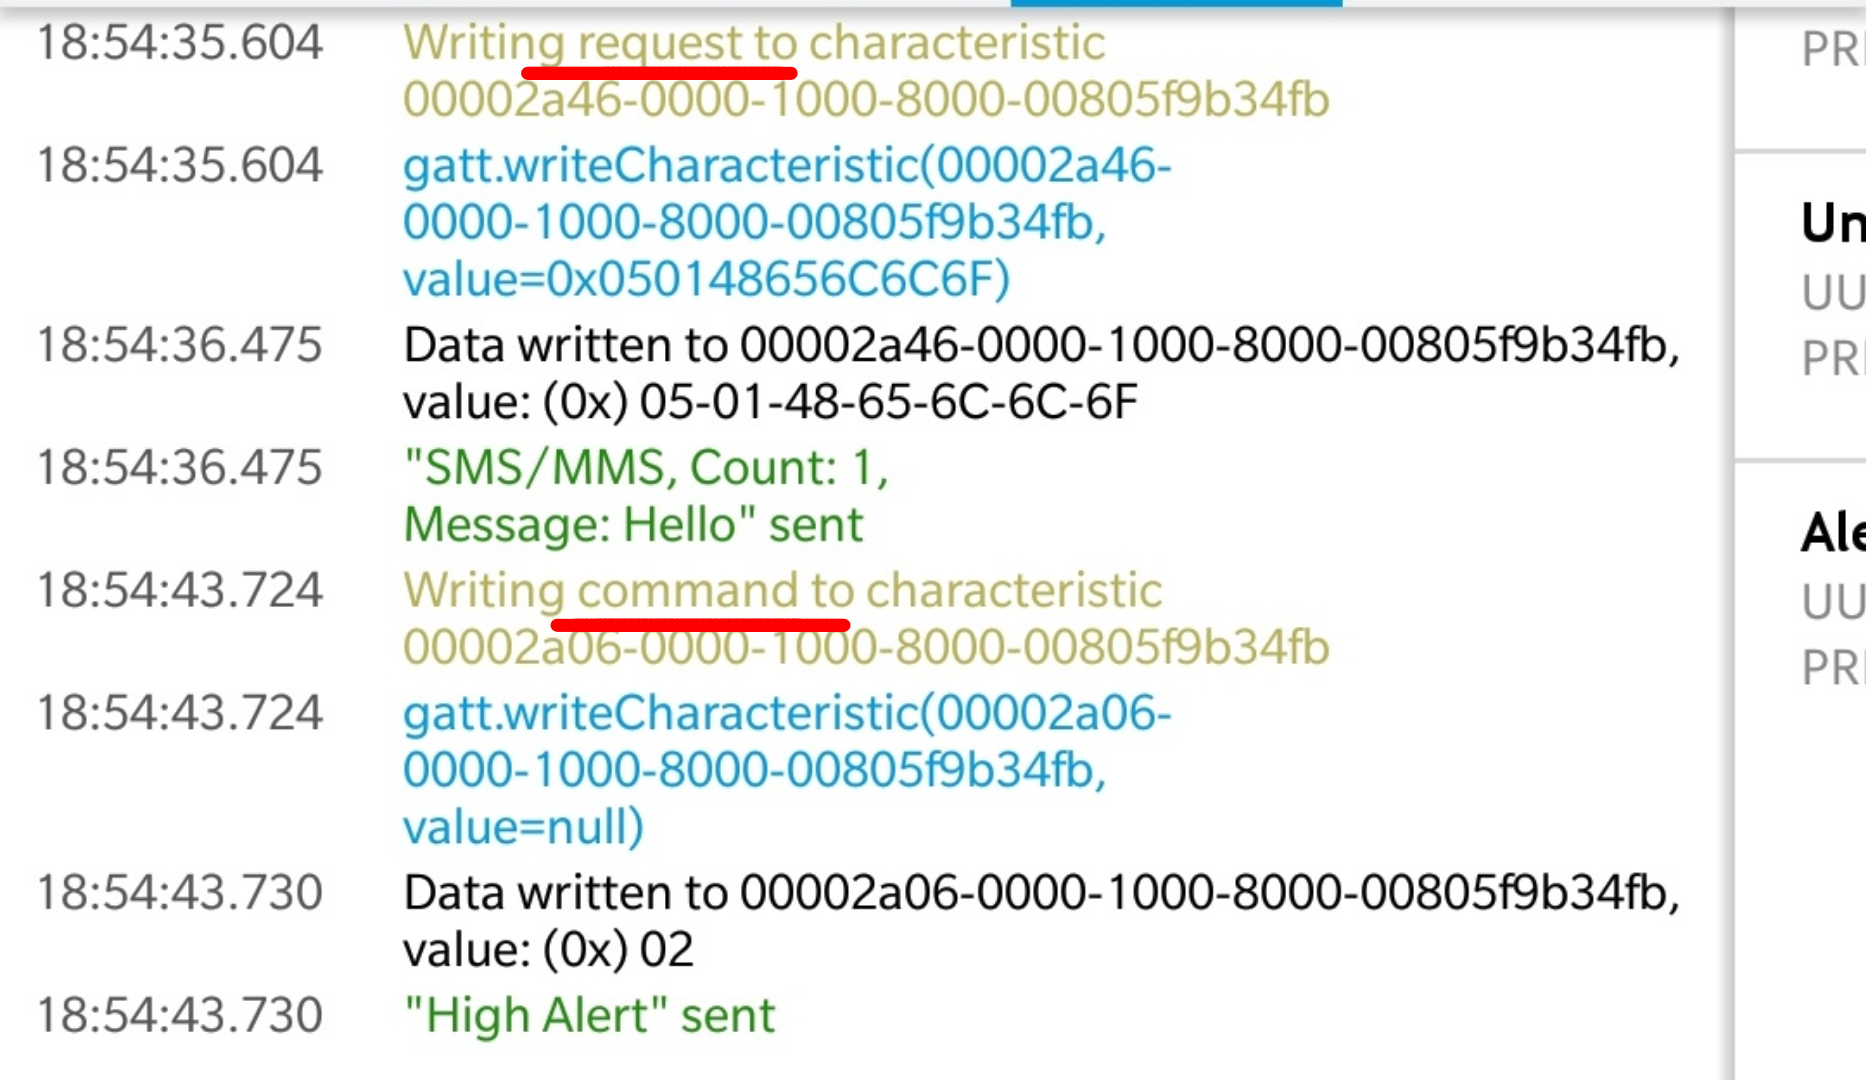
If you see carefully while writing to the characteristic, there are two things. A Request and a Command.
I then found this, https://www.oreilly.com/library/view/getting-started-with/9781491900550/ch04.html
Write without response This feature is the converse equivalent of notifications and uses Write Command packets. Write Commands are unacknowledged packets that include a handle and a value, and they can be sent at any time and in any amount without any flow control mechanism.This is when I realized that withResponse=True parameter is required to send Command. As soon as I had withResponse=True parameter, the miBand displayed notification 😀
After this, I was wondering if I could change the date and time in miBand. I was able to change the date, and let’s see how I did it.
Again I used the nrfConnect app to see the log. I pulled the value first and got this on log.
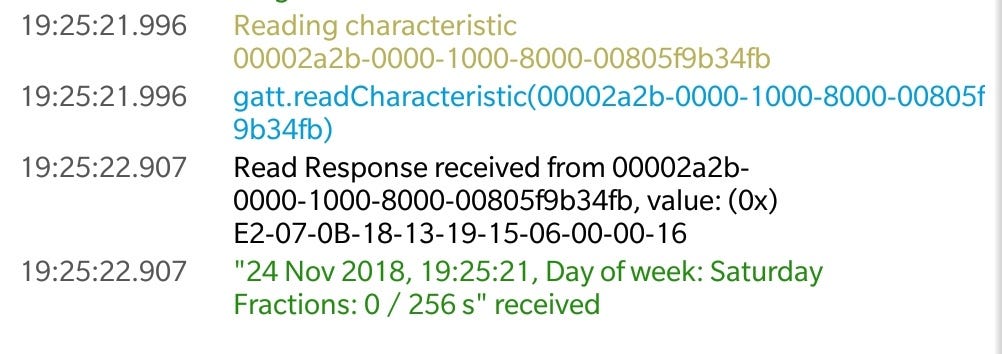
I got the characteristic, 00002A2B-0000–1000–8000–00805f9b34fb and even the value.
The value received was E2–07–0B-18–13–19–15–06–00–00–16.
I started decoding the values.

Note: The hex values here are decimal to hex values and not the string to hex values.
And the next question is how E2 07 is 2018?
This is something interesting here. Hex can have the value from 0–255. But the current year is 2018. So we first need to do the modulo operation 2018 % 256 = 226 Now 226 decimal to hex is E2 😀 Now again let’s divide 2018 / 256 = 7. So the next two bytes 07 represent the fraction. So if you wanted to represent the year 2099, it, 0x 33 08.
I then wrote another function in python to change the date.

This changes the date and time to 2018-Jan-30 00:00:00. You may change this value to whatever you like.
This is how I was able to change the date, send missed call/ call/ sms/mms/ email notifications to miBand remotely.
While connecting to BLE devices you might encounter problems like device or resource busy, or even may fail to connect. Use this command to reset your bluetooth device
sudo hciconfig hci0 reset
And also, I built the command-line tool to automate all these tasks. Here is how it looks.
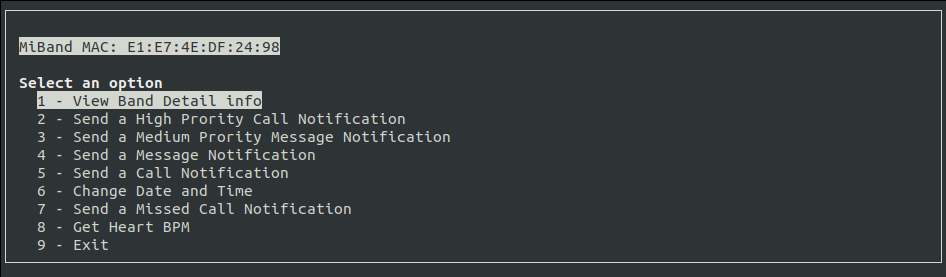
The code will be available on GitHub. The link is mentioned below 😉
And also, While working on this hack, I found an awesome tool preinstalled with bluez stack called btmon, it is essentially a Wireshark for Bluetooth.
Anything your computer sends to your Bluetooth device and Bluetooth device back to the machine can be sniffed by btmon.
This is an awesome tool for sniffing your Bluetooth packets.
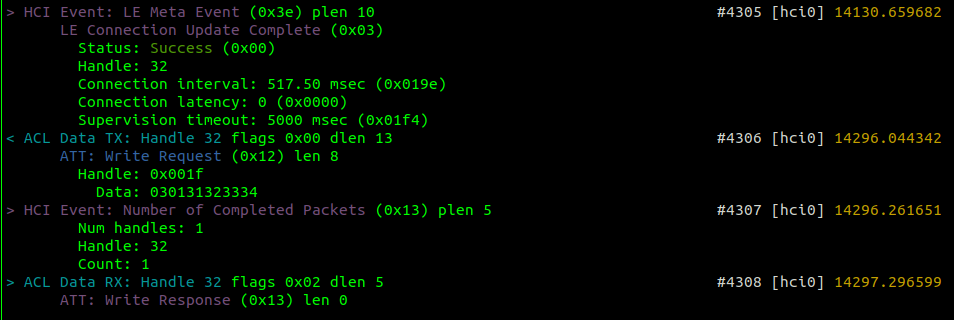
You can run btmon using this command:
sudo btmon
In case, you wanted to learn on how mi Band app and band are authenticating, communicating etc make sure to check out this: https://github.com/Freeyourgadget/Gadgetbridge
Here is the video:
Code:
The code is available on GitHub https://github.com/yogeshojha/MiBand3
The tool is pretty simple to use, make sure you install the required pip packages in requirements.txt file. The usage instructions are provided in the GitHub page.